Installing the development version of scikit-learn#
This section introduces how to install the main branch of scikit-learn. This can be done by either installing a nightly build or building from source.
Installing nightly builds#
The continuous integration servers of the scikit-learn project build, test and upload wheel packages for the most recent Python version on a nightly basis.
Installing a nightly build is the quickest way to:
try a new feature that will be shipped in the next release (that is, a feature from a pull-request that was recently merged to the main branch);
check whether a bug you encountered has been fixed since the last release.
You can install the nightly build of scikit-learn using the scientific-python-nightly-wheels
index from the PyPI registry of anaconda.org:
pip install --pre --extra-index https://pypi.anaconda.org/scientific-python-nightly-wheels/simple scikit-learn
Note that first uninstalling scikit-learn might be required to be able to install nightly builds of scikit-learn.
Building from source#
Building from source is required to work on a contribution (bug fix, new feature, code or documentation improvement).
Use Git to check out the latest source from the scikit-learn repository on Github.:
git clone https://github.com/scikit-learn/scikit-learn.git  # add --depth 1 if your connection is slow
cd scikit-learn
If you plan on submitting a pull-request, you should clone from your fork instead.
Install a recent version of Python (3.10 or later) for instance using conda-forge. Conda-forge provides a conda-based distribution of Python and the most popular scientific libraries.
If you installed Python with conda, we recommend to create a dedicated conda environment with all the build dependencies of scikit-learn (namely NumPy, SciPy, Cython, meson-python and Ninja):
conda create -n sklearn-env -c conda-forge python numpy scipy cython meson-python ninjaIt is not always necessary but it is safer to open a new prompt before activating the newly created conda environment.
conda activate sklearn-envAlternative to conda: You can use alternative installations of Python provided they are recent enough (3.10 or higher). Here is an example of how to create a build environment for a Linux system’s Python. Build dependencies are installed with
pipin a dedicated virtualenv to avoid disrupting other Python programs installed on the system:python3 -m venv sklearn-env source sklearn-env/bin/activate pip install wheel numpy scipy cython meson-python ninja
Install a compiler with OpenMP support for your platform. See instructions for Windows, macOS, Linux and FreeBSD.
Note
If OpenMP is not supported by the compiler, the build will be done with OpenMP functionalities disabled. This is not recommended since it will force some estimators to run in sequential mode instead of leveraging thread-based parallelism. Setting the
SKLEARN_FAIL_NO_OPENMPenvironment variable (before cythonization) will force the build to fail if OpenMP is not supported.Build the project with pip:
pip install --editable . \
   --verbose --no-build-isolation \
   --config-settings editable-verbose=true
Check that the installed scikit-learn has a version number ending with
.dev0:python -c "import sklearn; sklearn.show_versions()"Please refer to the Developer’s Guide and Useful pytest aliases and flags to run the tests on the module of your choice.
Note
--config-settings editable-verbose=true is optional but recommended
to avoid surprises when you import sklearn. meson-python implements
editable installs by rebuilding sklearn when executing import sklearn.
With the recommended setting you will see a message when this happens,
rather than potentially waiting without feedback and wondering
what is taking so long. Bonus: this means you only have to run the pip
install command once, sklearn will automatically be rebuilt when
importing sklearn.
Note that --config-settings is only supported in pip version 23.1 or
later. To upgrade pip to a compatible version, run pip install -U pip.
Building a specific version from a tag#
If you want to build a stable version, you can git checkout <VERSION>
to get the code for that particular version, or download an zip archive of
the version from github.
Platform-specific instructions#
Here are instructions to install a working C/C++ compiler with OpenMP support to build scikit-learn Cython extensions for each supported platform.
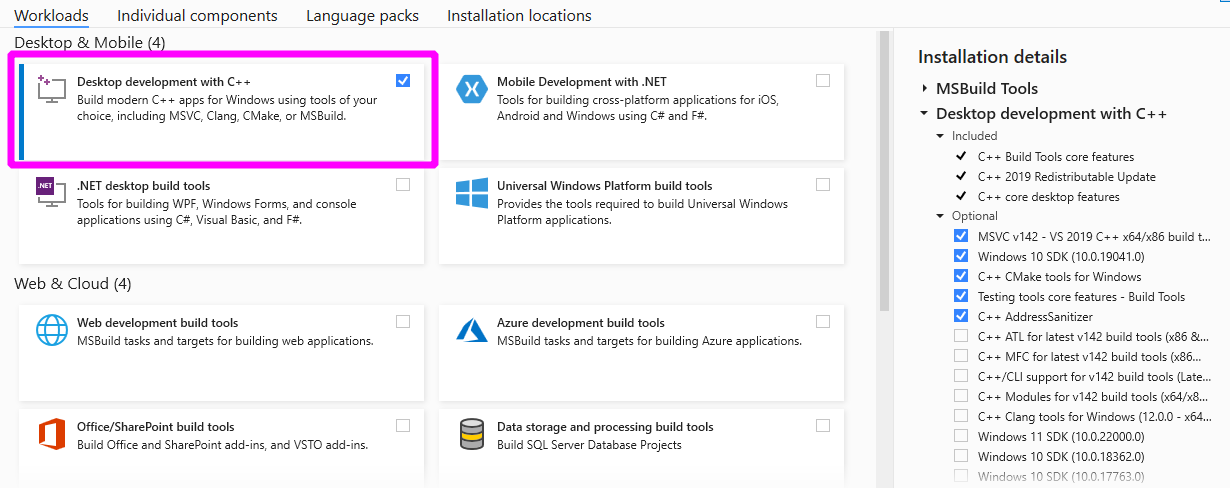
Windows#
First, download the Build Tools for Visual Studio installer.
Run the downloaded vs_buildtools.exe file, during the installation you will
need to make sure you select “Desktop development with C++”, similarly to this
screenshot:
Build scikit-learn by running the following command in your sklearn-env conda environment
or virtualenv:
pip install --editable . --verbose --no-build-isolation --config-settings editable-verbose=true
macOS#
The default C compiler on macOS, Apple clang (confusingly aliased as
/usr/bin/gcc), does not directly support OpenMP. We present two alternatives
to enable OpenMP support:
either install
conda-forge::compilerswith conda;or install
libompwith Homebrew to extend the default Apple clang compiler.
macOS compilers from conda-forge#
If you use the conda package manager (version >= 4.7), you can install the
compilers meta-package from the conda-forge channel, which provides
OpenMP-enabled C/C++ compilers based on the llvm toolchain.
First install the macOS command line tools:
xcode-select --install
It is recommended to use a dedicated conda environment to build scikit-learn from source:
conda create -n sklearn-dev -c conda-forge python numpy scipy cython \
    joblib threadpoolctl pytest compilers llvm-openmp meson-python ninja
It is not always necessary but it is safer to open a new prompt before activating the newly created conda environment.
conda activate sklearn-dev
make clean
pip install --editable . \
    --verbose --no-build-isolation \
    --config-settings editable-verbose=true
Note
If you get any conflicting dependency error message, try commenting out
any custom conda configuration in the $HOME/.condarc file. In
particular the channel_priority: strict directive is known to cause
problems for this setup.
You can check that the custom compilers are properly installed from conda forge using the following command:
conda list
which should include compilers and llvm-openmp.
The compilers meta-package will automatically set custom environment variables:
echo $CC
echo $CXX
echo $CFLAGS
echo $CXXFLAGS
echo $LDFLAGS
They point to files and folders from your sklearn-dev conda environment
(in particular in the bin/, include/ and lib/ subfolders). For instance
-L/path/to/conda/envs/sklearn-dev/lib should appear in LDFLAGS.
In the log, you should see the compiled extension being built with the clang
and clang++ compilers installed by conda with the -fopenmp command line
flag.
macOS compilers from Homebrew#
Another solution is to enable OpenMP support for the clang compiler shipped by default on macOS.
First install the macOS command line tools:
xcode-select --install
Install the Homebrew package manager for macOS.
Install the LLVM OpenMP library:
brew install libomp
Finally, build scikit-learn in verbose mode (to check for the presence of the
-fopenmp flag in the compiler commands):
make clean
pip install --editable . \
    --verbose --no-build-isolation \
    --config-settings editable-verbose=true
Linux#
Linux compilers from the system#
Installing scikit-learn from source without using conda requires you to have installed the scikit-learn Python development headers and a working C/C++ compiler with OpenMP support (typically the GCC toolchain).
Install build dependencies for Debian-based operating systems, e.g. Ubuntu:
sudo apt-get install build-essential python3-dev python3-pip
then proceed as usual:
pip3 install cython
pip3 install --editable . \
    --verbose --no-build-isolation \
    --config-settings editable-verbose=true
Cython and the pre-compiled wheels for the runtime dependencies (numpy, scipy
and joblib) should automatically be installed in
$HOME/.local/lib/pythonX.Y/site-packages. Alternatively you can run the
above commands from a virtualenv or a conda environment to get full
isolation from the Python packages installed via the system packager. When
using an isolated environment, pip3 should be replaced by pip in the
above commands.
When precompiled wheels of the runtime dependencies are not available for your architecture (e.g. ARM), you can install the system versions:
sudo apt-get install cython3 python3-numpy python3-scipy
On Red Hat and clones (e.g. CentOS), install the dependencies using:
sudo yum -y install gcc gcc-c++ python3-devel numpy scipy
Linux compilers from conda-forge#
Alternatively, install a recent version of the GNU C Compiler toolchain (GCC) in the user folder using conda:
conda create -n sklearn-dev -c conda-forge python numpy scipy cython \
    joblib threadpoolctl pytest compilers meson-python ninja
It is not always necessary but it is safer to open a new prompt before activating the newly created conda environment.
conda activate sklearn-dev
pip install --editable . \
    --verbose --no-build-isolation \
    --config-settings editable-verbose=true
FreeBSD#
The clang compiler included in FreeBSD 12.0 and 11.2 base systems does not
include OpenMP support. You need to install the openmp library from packages
(or ports):
sudo pkg install openmp
This will install header files in /usr/local/include and libs in
/usr/local/lib. Since these directories are not searched by default, you
can set the environment variables to these locations:
export CFLAGS="$CFLAGS -I/usr/local/include"
export CXXFLAGS="$CXXFLAGS -I/usr/local/include"
export LDFLAGS="$LDFLAGS -Wl,-rpath,/usr/local/lib -L/usr/local/lib -lomp"
Finally, build the package using the standard command:
pip install --editable . \
    --verbose --no-build-isolation \
    --config-settings editable-verbose=true
For the upcoming FreeBSD 12.1 and 11.3 versions, OpenMP will be included in the base system and these steps will not be necessary.